 |
| Printed Circuit |

Saturday, July 18, 2015
Printing Circuits Tutorial
A step by step tutorial for setting up and printing your own conductive circuits can be found here. This methodology will continue to be used for future circuit applications on this blog.
Friday, July 17, 2015
Printed Circuit
An electrically conductive circuit was finally able to be achieved. This was done using the "Fingerprint Method". I smudged my fingers on the transparency (cellulose acetate) where my circuit would be printed. Then I ran it through the printer. The initial resistance of the trace (right after printing) is about 250 - 300 Ω for a current traveling 1 cm. This drops down to about 25 - 50 Ω after a few hours.
A few different methods were experimented with when it came to attaching the components to the circuit. At first, electrical tape was used to adhere the components to the substrate. This worked, but if it was not placed tight enough then the component had a change to "hover" over the trace and not complete the connection. I drop of solder was then used to try to help stick the components to the circuit. This proved difficult as there was a high change that the heat radiated from the iron would melt away the circuit and substrate (Fig 1). It was finally settled on to use copper tape. This provides good adhesion for the components as well as being conductive itself (Fig 2).
A blank piece of paper was placed under the substrate to allow for less glare during imaging. Fig 3 shows that the trace is complete and the LED is lit up. Some of the components were bent to allow for easier taping.
Future work will involve more precise placement of the tape using tweezers and the design/measurement of printed capacitors.
A few different methods were experimented with when it came to attaching the components to the circuit. At first, electrical tape was used to adhere the components to the substrate. This worked, but if it was not placed tight enough then the component had a change to "hover" over the trace and not complete the connection. I drop of solder was then used to try to help stick the components to the circuit. This proved difficult as there was a high change that the heat radiated from the iron would melt away the circuit and substrate (Fig 1). It was finally settled on to use copper tape. This provides good adhesion for the components as well as being conductive itself (Fig 2).
 |
| Fig 1. Combination of Electrical Tape and Solder Connections |
 |
| Fig 2. Copper Tape Connections |
 |
| Fig 3. Working Circuit |
* The LED and Resistor are connected directly to each other as the trace between them was accidentally melted away with the soldering iron.
Quest for Conductivity
After the realization that fingerprint residue on the transparencies would allow for a conductive trace to form, many trials were run to try to replicate this phenomena with other, slightly more sanitary, sources. I will admit that most of my experience has led to me to become quite proficient in troubleshooting mechanical, electrical, and programming problems. Chemical problems on the other hand are completely new to me. None the less, I was as rigorous as I could have been in testing the printed circuits.
There were two main tips that the manufacturers gave for using their ink. They were to make sure to store the ink in a cool, dark place and to try to print in a humid environment. The ink was always stored in a cool, dark place so that was not an issue. It made sense to me that the moisture from my fingerprint could be enough to trigger the ink and that the lab was to dry by itself.
I first created a test circuit in Fritzing that involves an ATtiny blinking an LED. The entire circuit would be powered by a 9V battery. The circuit and print mask can be seen below (Fig 1 & 2). I then continued to print out this test circuit with the transparency and printer undergoing different conditions. I began by applying water to the transparencies. This was supposed to replicate the moisture from the fingerprint. After many tests ranging from "misting" the transparencies to "drenching" the transparencies with water from a spray bottle, none of the tested circuits were conductive.
After multiple days of rigorous testing, it was decided upon to just use fingerprints as that is what has (somehow) proven to be the best at creating a conductive circuit.
There were two main tips that the manufacturers gave for using their ink. They were to make sure to store the ink in a cool, dark place and to try to print in a humid environment. The ink was always stored in a cool, dark place so that was not an issue. It made sense to me that the moisture from my fingerprint could be enough to trigger the ink and that the lab was to dry by itself.
I first created a test circuit in Fritzing that involves an ATtiny blinking an LED. The entire circuit would be powered by a 9V battery. The circuit and print mask can be seen below (Fig 1 & 2). I then continued to print out this test circuit with the transparency and printer undergoing different conditions. I began by applying water to the transparencies. This was supposed to replicate the moisture from the fingerprint. After many tests ranging from "misting" the transparencies to "drenching" the transparencies with water from a spray bottle, none of the tested circuits were conductive.
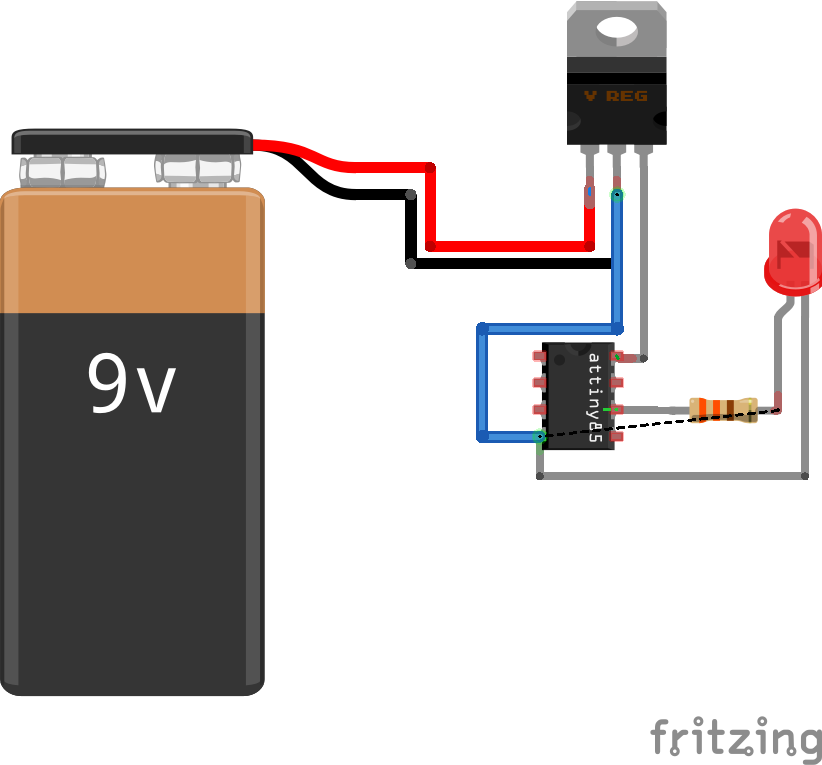 |
| Fig 1. Circuit Design |
 |
| Fig 2. Printed Circuit Design |
I then had the idea that it was a combination of the water and pressure from my fingerprint. I first misted some water on the transparency and put on a pair of latex gloves. I then proceeded to press down my thumb multiple times across the transparency. This did not yield a conductive circuit. I then believed that there was too much water on the transparency and gently sprayed the water onto the fingers of the gloves first. I then applied pressure to the substrate again. This also did not yield conductivity.
It was then suspected that it was a different substance from the fingerprint oils then water that was causing it to activate. Not having very many options to test with however, it was resorted to doing a quick test with unscented hairspray and isopropal rubbing alcohol. These also did not yield any promising results.
Thankfully, today was a very humid day in South Bend with a humidity of 93%. The lab seemed to be too dry of an environment, so the printing station was set up outside (Fig 3). After running multiple tests, the outdoor humidity had no positive effect on the circuits. I even brought the printer into a small bathroom and hoped the steam from a hot shower would provide the appropriate humidity needed for a conductive circuit. That failed as well.
 |
| Fig 3. Outdoors, High-Humidity Set Up |
Sunday, July 12, 2015
Transparencies & Fingerprints
Due to past testing, a hypothesis was developed that the fibers in the paper were prohibiting the bonding of the silver nano particles and therefore no electrical connection was forming. Transparencies were then obtained to test this. The transparency sheet had two different sides to it. One side of the sheet was coated with a "quick drying" agent while the other was left plane. Both sides were tested and compared to paper. The test was composed of printing a series of alternating colored lines (Black, Yellow, Magenta, and Cyan) and testing for conductivity (Fig. 1).
The was an immediate, noticeable difference between the printed ink on the different substrates. The paper substrate (Fig. 2) appeared to have varying shades of black printed on it. The ink on the non-coated side of the transparency was still moist and gold in color (Fig. 3). The ink on the coated side of the transparency was very uniform in color and gave off a silver, metallic shine (Fig. 4). The colors could be seen on the reverse side of this same sheet however (Fig. 5).
None of these substrates were found to contain printed lines that were electrically conductive. These substrates were then analyzed under a microscope to look for clues as to their lack of conductivity. Figure 6 shows the paper substrate and the individual fibers being visible. Figure 7 and 8 show a zoomed in view of the lines of the non-coated side and coated side respectively.
Figure 8 appears to be a very consistent print job with only minor gaps within the lines. It seems a lot more plausible for it to be able to conduct electricity than the paper in Fig 6. More tests will be conducted with subsequent prints to see if that can affect the conductivity.
 |
| Fig 1. Test Print |
The was an immediate, noticeable difference between the printed ink on the different substrates. The paper substrate (Fig. 2) appeared to have varying shades of black printed on it. The ink on the non-coated side of the transparency was still moist and gold in color (Fig. 3). The ink on the coated side of the transparency was very uniform in color and gave off a silver, metallic shine (Fig. 4). The colors could be seen on the reverse side of this same sheet however (Fig. 5).
 |
| Fig 2. Paper Substrate |
 |
| Fig 3. Non-Coated Transparency |
 |
| Fig 4. Coated Transparency |
 |
| Fig 5. Back Side of Transparency in Fig 4 |
None of these substrates were found to contain printed lines that were electrically conductive. These substrates were then analyzed under a microscope to look for clues as to their lack of conductivity. Figure 6 shows the paper substrate and the individual fibers being visible. Figure 7 and 8 show a zoomed in view of the lines of the non-coated side and coated side respectively.
 |
| Fig 6. Printed Ink on Paper Substrate |
 |
| Fig 7. Printed Ink on Non-Coated Transparency |
 |
| Fig 8. Printed Ink on Coated Transparency |
Figure 8 appears to be a very consistent print job with only minor gaps within the lines. It seems a lot more plausible for it to be able to conduct electricity than the paper in Fig 6. More tests will be conducted with subsequent prints to see if that can affect the conductivity.
It was then noted that there appeared to be residue of a fingerprint on the coated transparency (Fig 9). This was due to improper handling of the substrate without gloves. However, upon closer inspection, the lines of the fingerprint that had been printed on were conductive! Under the microscope it was observed that fingerprint residue had caused the ink to turn from silver to gold (Fig 10). The conductivity of the fingerprint test was repeated and successful. In the ink's product manual it states that dry or arid conditions may prohibit the formation of conductive traces. Future tests will be run to try to print in a more humid environment or with moistened substrates as this has suggested to lead to conductivity.
 |
| Fig 9. Fingerprint Residue on Coated Transparency |
 |
| Fig 10. Conductive Fingerprint Image |
Thursday, July 9, 2015
Printing Resolution
To determine what the smallest circuits possible would be on this printer, the printing resolution was tested. This test was performed multiple times and the best images captured under the microscope are presented below. Figure 1 shows an example of a single line with a width of 50 microns. Unfortunately, this line has many breaks and gaps in it. This would not lead to a conductive trace. Figure 2 shows a much thicker line. In addition, this line was printed on top of twice. It can be seen that the majority of gaps have been filled in. This would provide a much better chance of achieving electrical conduction. Figure 3 shows a range of line widths. These were used to find what the minimum line width was that was possible of being printed. The line widths from the bottom to top were designed to be 10, 20, 30, 40, 50, 75, 100, 125, 150, 200, 300, 400 microns. Note that the bottom five line widths are all about the same. It was concluded that 50 microns (whether due to the printer or AutoCAD) is the best resolution that can be achieved in our current setup.
 |
| Fig 1. Ink Line Test |
 |
| Fig 2. Ink Edge Test |
 |
| Fig 3. Ink Line Widths Test |
Capacitor Measurement
One goal of this project will be to successfully print a capacitor. To make sure that the printed capacitor achieves the desired capacitance, it has to be measured. A tutorial was created demonstrating how an Arduino could be programmed to measure the capacitance can be found here. The program works by timing how long it takes for the capacitor to reach 63.2% of its total voltage. This value is also known as the RC time constant. When the time constant is found, the capacitance can be solved for due to the fact that the resistance of the circuit is already known.

Ink Conductivity
The conductivity of the ink was first tested by directly applying it to a sheet of printer paper. The manufacturer stated that if the ink dries golden then that means it is electrically conductive. If, however, the ink were to dry silver in color then that would mean it is not electrically conductive. The images below show some examples of the dried ink on printer paper under a microscope.
 |
| Fig 1. Conductive Droplet |
 |
| Fig 2. Fibers visible in silver area but not gold |
 |
| Fig 3. Golden ink forms shell above the plane of the paper |
From what I have gathered, a sufficient amount of ink is necessary to create a conductive trace on paper. When conductive spots emerge, it can be seen that a shell is formed that rises above the actual paper itself. Where as the silver spots soak into the paper and the individual paper fibers can still be seen. This could be due to the fact that the fibers in the paper are wicking away the ink and prohibiting it from coagulating. More tests will be run to try to further saturate the paper with ink and also using transparencies. Transparencies have the benefit of having no fibers that could interfere with the placement of the ink.
Subscribe to:
Posts (Atom)