 |
| Printed Circuit |

Saturday, July 18, 2015
Printing Circuits Tutorial
A step by step tutorial for setting up and printing your own conductive circuits can be found here. This methodology will continue to be used for future circuit applications on this blog.
Friday, July 17, 2015
Printed Circuit
An electrically conductive circuit was finally able to be achieved. This was done using the "Fingerprint Method". I smudged my fingers on the transparency (cellulose acetate) where my circuit would be printed. Then I ran it through the printer. The initial resistance of the trace (right after printing) is about 250 - 300 Ω for a current traveling 1 cm. This drops down to about 25 - 50 Ω after a few hours.
A few different methods were experimented with when it came to attaching the components to the circuit. At first, electrical tape was used to adhere the components to the substrate. This worked, but if it was not placed tight enough then the component had a change to "hover" over the trace and not complete the connection. I drop of solder was then used to try to help stick the components to the circuit. This proved difficult as there was a high change that the heat radiated from the iron would melt away the circuit and substrate (Fig 1). It was finally settled on to use copper tape. This provides good adhesion for the components as well as being conductive itself (Fig 2).
A blank piece of paper was placed under the substrate to allow for less glare during imaging. Fig 3 shows that the trace is complete and the LED is lit up. Some of the components were bent to allow for easier taping.
Future work will involve more precise placement of the tape using tweezers and the design/measurement of printed capacitors.
A few different methods were experimented with when it came to attaching the components to the circuit. At first, electrical tape was used to adhere the components to the substrate. This worked, but if it was not placed tight enough then the component had a change to "hover" over the trace and not complete the connection. I drop of solder was then used to try to help stick the components to the circuit. This proved difficult as there was a high change that the heat radiated from the iron would melt away the circuit and substrate (Fig 1). It was finally settled on to use copper tape. This provides good adhesion for the components as well as being conductive itself (Fig 2).
 |
| Fig 1. Combination of Electrical Tape and Solder Connections |
 |
| Fig 2. Copper Tape Connections |
 |
| Fig 3. Working Circuit |
* The LED and Resistor are connected directly to each other as the trace between them was accidentally melted away with the soldering iron.
Quest for Conductivity
After the realization that fingerprint residue on the transparencies would allow for a conductive trace to form, many trials were run to try to replicate this phenomena with other, slightly more sanitary, sources. I will admit that most of my experience has led to me to become quite proficient in troubleshooting mechanical, electrical, and programming problems. Chemical problems on the other hand are completely new to me. None the less, I was as rigorous as I could have been in testing the printed circuits.
There were two main tips that the manufacturers gave for using their ink. They were to make sure to store the ink in a cool, dark place and to try to print in a humid environment. The ink was always stored in a cool, dark place so that was not an issue. It made sense to me that the moisture from my fingerprint could be enough to trigger the ink and that the lab was to dry by itself.
I first created a test circuit in Fritzing that involves an ATtiny blinking an LED. The entire circuit would be powered by a 9V battery. The circuit and print mask can be seen below (Fig 1 & 2). I then continued to print out this test circuit with the transparency and printer undergoing different conditions. I began by applying water to the transparencies. This was supposed to replicate the moisture from the fingerprint. After many tests ranging from "misting" the transparencies to "drenching" the transparencies with water from a spray bottle, none of the tested circuits were conductive.
After multiple days of rigorous testing, it was decided upon to just use fingerprints as that is what has (somehow) proven to be the best at creating a conductive circuit.
There were two main tips that the manufacturers gave for using their ink. They were to make sure to store the ink in a cool, dark place and to try to print in a humid environment. The ink was always stored in a cool, dark place so that was not an issue. It made sense to me that the moisture from my fingerprint could be enough to trigger the ink and that the lab was to dry by itself.
I first created a test circuit in Fritzing that involves an ATtiny blinking an LED. The entire circuit would be powered by a 9V battery. The circuit and print mask can be seen below (Fig 1 & 2). I then continued to print out this test circuit with the transparency and printer undergoing different conditions. I began by applying water to the transparencies. This was supposed to replicate the moisture from the fingerprint. After many tests ranging from "misting" the transparencies to "drenching" the transparencies with water from a spray bottle, none of the tested circuits were conductive.
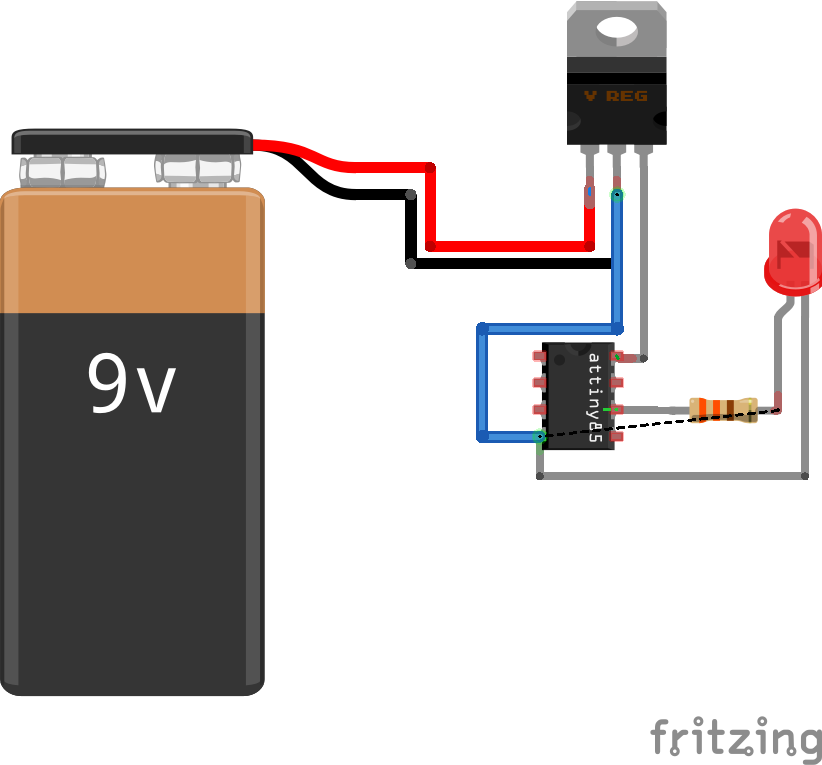 |
| Fig 1. Circuit Design |
 |
| Fig 2. Printed Circuit Design |
I then had the idea that it was a combination of the water and pressure from my fingerprint. I first misted some water on the transparency and put on a pair of latex gloves. I then proceeded to press down my thumb multiple times across the transparency. This did not yield a conductive circuit. I then believed that there was too much water on the transparency and gently sprayed the water onto the fingers of the gloves first. I then applied pressure to the substrate again. This also did not yield conductivity.
It was then suspected that it was a different substance from the fingerprint oils then water that was causing it to activate. Not having very many options to test with however, it was resorted to doing a quick test with unscented hairspray and isopropal rubbing alcohol. These also did not yield any promising results.
Thankfully, today was a very humid day in South Bend with a humidity of 93%. The lab seemed to be too dry of an environment, so the printing station was set up outside (Fig 3). After running multiple tests, the outdoor humidity had no positive effect on the circuits. I even brought the printer into a small bathroom and hoped the steam from a hot shower would provide the appropriate humidity needed for a conductive circuit. That failed as well.
 |
| Fig 3. Outdoors, High-Humidity Set Up |
Sunday, July 12, 2015
Transparencies & Fingerprints
Due to past testing, a hypothesis was developed that the fibers in the paper were prohibiting the bonding of the silver nano particles and therefore no electrical connection was forming. Transparencies were then obtained to test this. The transparency sheet had two different sides to it. One side of the sheet was coated with a "quick drying" agent while the other was left plane. Both sides were tested and compared to paper. The test was composed of printing a series of alternating colored lines (Black, Yellow, Magenta, and Cyan) and testing for conductivity (Fig. 1).
The was an immediate, noticeable difference between the printed ink on the different substrates. The paper substrate (Fig. 2) appeared to have varying shades of black printed on it. The ink on the non-coated side of the transparency was still moist and gold in color (Fig. 3). The ink on the coated side of the transparency was very uniform in color and gave off a silver, metallic shine (Fig. 4). The colors could be seen on the reverse side of this same sheet however (Fig. 5).
None of these substrates were found to contain printed lines that were electrically conductive. These substrates were then analyzed under a microscope to look for clues as to their lack of conductivity. Figure 6 shows the paper substrate and the individual fibers being visible. Figure 7 and 8 show a zoomed in view of the lines of the non-coated side and coated side respectively.
Figure 8 appears to be a very consistent print job with only minor gaps within the lines. It seems a lot more plausible for it to be able to conduct electricity than the paper in Fig 6. More tests will be conducted with subsequent prints to see if that can affect the conductivity.
 |
| Fig 1. Test Print |
The was an immediate, noticeable difference between the printed ink on the different substrates. The paper substrate (Fig. 2) appeared to have varying shades of black printed on it. The ink on the non-coated side of the transparency was still moist and gold in color (Fig. 3). The ink on the coated side of the transparency was very uniform in color and gave off a silver, metallic shine (Fig. 4). The colors could be seen on the reverse side of this same sheet however (Fig. 5).
 |
| Fig 2. Paper Substrate |
 |
| Fig 3. Non-Coated Transparency |
 |
| Fig 4. Coated Transparency |
 |
| Fig 5. Back Side of Transparency in Fig 4 |
None of these substrates were found to contain printed lines that were electrically conductive. These substrates were then analyzed under a microscope to look for clues as to their lack of conductivity. Figure 6 shows the paper substrate and the individual fibers being visible. Figure 7 and 8 show a zoomed in view of the lines of the non-coated side and coated side respectively.
 |
| Fig 6. Printed Ink on Paper Substrate |
 |
| Fig 7. Printed Ink on Non-Coated Transparency |
 |
| Fig 8. Printed Ink on Coated Transparency |
Figure 8 appears to be a very consistent print job with only minor gaps within the lines. It seems a lot more plausible for it to be able to conduct electricity than the paper in Fig 6. More tests will be conducted with subsequent prints to see if that can affect the conductivity.
It was then noted that there appeared to be residue of a fingerprint on the coated transparency (Fig 9). This was due to improper handling of the substrate without gloves. However, upon closer inspection, the lines of the fingerprint that had been printed on were conductive! Under the microscope it was observed that fingerprint residue had caused the ink to turn from silver to gold (Fig 10). The conductivity of the fingerprint test was repeated and successful. In the ink's product manual it states that dry or arid conditions may prohibit the formation of conductive traces. Future tests will be run to try to print in a more humid environment or with moistened substrates as this has suggested to lead to conductivity.
 |
| Fig 9. Fingerprint Residue on Coated Transparency |
 |
| Fig 10. Conductive Fingerprint Image |
Thursday, July 9, 2015
Printing Resolution
To determine what the smallest circuits possible would be on this printer, the printing resolution was tested. This test was performed multiple times and the best images captured under the microscope are presented below. Figure 1 shows an example of a single line with a width of 50 microns. Unfortunately, this line has many breaks and gaps in it. This would not lead to a conductive trace. Figure 2 shows a much thicker line. In addition, this line was printed on top of twice. It can be seen that the majority of gaps have been filled in. This would provide a much better chance of achieving electrical conduction. Figure 3 shows a range of line widths. These were used to find what the minimum line width was that was possible of being printed. The line widths from the bottom to top were designed to be 10, 20, 30, 40, 50, 75, 100, 125, 150, 200, 300, 400 microns. Note that the bottom five line widths are all about the same. It was concluded that 50 microns (whether due to the printer or AutoCAD) is the best resolution that can be achieved in our current setup.
 |
| Fig 1. Ink Line Test |
 |
| Fig 2. Ink Edge Test |
 |
| Fig 3. Ink Line Widths Test |
Capacitor Measurement
One goal of this project will be to successfully print a capacitor. To make sure that the printed capacitor achieves the desired capacitance, it has to be measured. A tutorial was created demonstrating how an Arduino could be programmed to measure the capacitance can be found here. The program works by timing how long it takes for the capacitor to reach 63.2% of its total voltage. This value is also known as the RC time constant. When the time constant is found, the capacitance can be solved for due to the fact that the resistance of the circuit is already known.

Ink Conductivity
The conductivity of the ink was first tested by directly applying it to a sheet of printer paper. The manufacturer stated that if the ink dries golden then that means it is electrically conductive. If, however, the ink were to dry silver in color then that would mean it is not electrically conductive. The images below show some examples of the dried ink on printer paper under a microscope.
 |
| Fig 1. Conductive Droplet |
 |
| Fig 2. Fibers visible in silver area but not gold |
 |
| Fig 3. Golden ink forms shell above the plane of the paper |
From what I have gathered, a sufficient amount of ink is necessary to create a conductive trace on paper. When conductive spots emerge, it can be seen that a shell is formed that rises above the actual paper itself. Where as the silver spots soak into the paper and the individual paper fibers can still be seen. This could be due to the fact that the fibers in the paper are wicking away the ink and prohibiting it from coagulating. More tests will be run to try to further saturate the paper with ink and also using transparencies. Transparencies have the benefit of having no fibers that could interfere with the placement of the ink.
Tuesday, June 23, 2015
Program an ATtiny44/45/84/85 with Arduino
One great aspect of printed circuits is that they can really cut down the weight of the overall project. Sometimes, you still need to be able to program your circuits and have a little more power behind it. Arduino's are great but they can get very large and expensive for smaller projects. Therefore, I have created a tutorial on how to use an Arduino to program a much smaller AVR chip, the ATtiny. These have many of the same functionalities as Arduino, but allow you to incorporate them into much smaller designs. Many of the circuits that will be printed on this blog will involve these AVR chips and the tutorial for it can be found here.


Friday, June 19, 2015
Side Project: Controlling a Stepper Motor with an Arduino
When disassembling the printer, some stepper motors were salvaged from it. A stepper motor consists of two main parts, a rotor and a stator. The rotor is the part of the motor that actually spins and provides work. The stator is the stationary part of the motor that houses the rotor. In a stepper motor, the rotor is a permanent magnet. The stator consists of multiple coils that act as electromagnets when an electrical current is passed through them. The electromagnetic coil will cause the rotor to align with it when charged. The rotor is propelled by alternating which coil has a current running through it.
Stepper motors have a number of benefits. They are cheap and easy to use. When there is no current send to the motor, the steppers firmly hold their position. Stepper motors can also rotate without limits and change direction based on the polarity provided.
Stepper motors have a number of benefits. They are cheap and easy to use. When there is no current send to the motor, the steppers firmly hold their position. Stepper motors can also rotate without limits and change direction based on the polarity provided.
A tutorial of how to operate these stepper motors with an Arduino was created and can be found here.

Disassembling a Brother MFC-J450DW Printer
To better utilize the MFC-J450DW printer, it became necessary to take it apart. This would allow for unnecessary features (such as scanning and faxing) to be removed while at the same time gaining insight on how exactly this model handles printing. A rough step by step guide of the tare down can be found here.
Surprisingly it was found that this printer does not print directly from the print cartridges themselves. Instead, the cartridges merely act as a reservoir to hold the ink before they are pumped up to the actual print head. More so, these pumps came pre-charged with ink. This means that to use this printer for printing circuits the reservoirs, tubes, and pumps must first be cleaned as to not contaminate the ink. It is recommended to find a printer that prints directly from the cartridges themselves so there is a less chance of contamination.

Thursday, May 28, 2015
Setting Up Your Printer
Getting started with printing circuits is a relatively
simple and inexpensive process. There are three main things you will need; an
inkjet printer, conductive ink, and a substrate.
When selecting a printer, almost any inkjet printer will
work. Some researchers claim that it is best to use a piezo-driven printer
rather than a thermal-driven one as it is less likely to alter the structure
and properties of the conductive ink.[1] It doesn’t need to have fancy
touchscreen controls or wireless connectivity. Just look for a cheap printer
that you would feel comfortable taking apart and modifying. Studies have shown
that Brother Co. printers are the preferred option when it comes to printing circuits
due to their nozzles releasing higher volumes of ink. [2] More ink on the page means
that there is a better chance of a solid connection or trace being made. The
projects on this blog will use a Brother MFC-J450DW. This model was chosen mostly
due to the fact that it was the cheapest on Amazon for about $80 at the time of
writing. It is also recommended that you purchase empty refillable ink
cartridges that are compatible with your model of printer. Trying to reuse the
standard ink cartridges may end up contaminating your conductive ink and lead
to poor connections. These refillable cartridges can range anywhere from $5-20
depending on the model of printer they are for.
Next you will need the ink. There are many properties such
as viscosity, surface tension, volatility, and particle size that need to be
taken into consideration for choosing a suitable ink. Luckily, an extensive
amount of research has already been done on this and there is a clear winner.
Silver nanoparticle ink, part number NBSIJ-MU01, from Mitsubishi Paper Mill
works the best for most applications.[3] This ink can be purchased
from Diamond-Jet for $340.00 per 100 ml.[4] Admittedly, this does sound
like a daunting price at first. However, most conventional ink cartridges only
contain between 10 – 15 ml of ink inside of them. So overall the price per ml
isn’t that much more expensive. With a 100 ml of silver nanoparticle ink you will
be able to print hundreds of circuits.
Another benefit of the NBSIJ-MU01 ink which helps justify
the price is that it is chemically sintered. Sintering is the process which
take a powdered material or solution and transform it into a solid. With inkjet
printing the printer does not print continuous lines. The printer prints many
small drops of ink. The sintering process helps combine the silver
nanoparticles in these drops together thus creating a complete circuit. Traditionally,
the inks would have to be sintered or “baked” in an oven for a few hours so
that the solidification process would take place.[5] Chemically sintered silver
nanoparticles are dissolved in a special solvent that allows for the reaction
to take place just seconds after it is printed.[2] This dramatically reduces the
time it takes to prototype a circuit.
The only thing left is the substrate. Choosing a proper
substrate is important because it dictates how well the ink will adhere and
last. There can be a lot of experimentation still done with the substrates as
some may work better in certain situations than others. Some good baseline
substrates are resin coated paper, white and transparent PET film, inkjet
paper, and glossy photo paper.[6]
Now hook up your printer, fill and
insert your ink cartridges, and start printing!
References
[1] M. M. Tentzeris, “Inkjet-Printed
Nanotechnology-Enabled Zero-Power Wireless Sensor Nodes for Internet-of-Things
(IoT) and M2M Applications,” ATHENA Research Group, School of ECE , Georgia
Institute of Technology, Atlanta, GA, 30332-250, USA.
[2] Y. Kawahara, S.
Hodges, B. S. Cook, C. Zhang, and G. D. Abowd, “Instant inkjet circuits:
lab-based inkjet printing to support rapid prototyping of UbiComp devices,”
2013, p. 363.
[3] P. H. King, J.
Scanlan, and A. Sobester, “From Radiosonde To Papersonde: The Use of Conductive
Inkjet Printing in the Massive Atmospheric Volume Instrumentation System
(MAVIS) Project,” 2015.
[4] “NBSIJ - Silver
Nanoparticle Ink - 100ml-1,” Mitsubishi Imaging (MPM), Inc. [Online].
Available: http://diamond-jet.com/silvernanoparticleink-2.aspx. [Accessed:
28-May-2015].
[5] T. Falat, B. Platek,
and J. Felba, “Sintering process of silver nanoparticles in ink-jet printed
conductive microstructures - Molecular dynamics approach,” 2012, pp. 1/5–5/5.
[6] Y. Kawahara, S.
Hodges, N.-W. Gong, S. Olberding, and J. Steimle, “Building Functional
Prototypes Using Conductive Inkjet Printing,” IEEE Pervasive Comput.,
vol. 13, no. 3, pp. 30–38, Jul. 2014.
What Are Printed Electronics?
Printed electronics can refer to a wide range of techniques
that are used to print electrical devices onto a substrate. A substrate is just
the technical term for any substance that the printing process takes place on
such as paper, glass, cover slips, etc. The techniques for printing electronics
are still largely being developed. Some of the main techniques include screen
printing[1], rotogravure[2], and inkjet.
Why use printers at all for electronics? Currently there are
two main ways of prototyping a circuit, breadboards and printed circuit boards
(PCB). They both have their own pros and cons. A breadboard allows for a cheap
way to easily connect wires and different components. However the standard
layout of a breadboard means that you must conform your parts to fit what you
are given.[3] A PCB can be designed to suit
the exact needs of the project you are working on. The manufacturing costs of
the PCB are its downfall for hobbyists however. It can take weeks to have your
order made and shipped to you or the use of potent chemicals if you wish to
etch it yourself.[4] The ability to print
electronics on demand combines the best qualities of a breadboard and PCB. They
are cheap to print, easy to add parts to, and can be revised very quickly. Printing
electronics is becoming to the electronics industry what 3D printing has become
to the mechanical industry.
This blog will focus on the inkjet printing method for it is
the cheapest and easiest method for hobbyists to get started with. Inkjet
printers work mainly by one of two ways. The first being a “Thermal Bubble”
where a current is first sent through tiny resistors in the print head. These
resistors give off heat and vaporize some of the nearby ink. This vaporization
of the ink creates a gas bubble which, as it expands, pushes ink out of the
nozzle in the form of tiny droplets. When the bubble eventually pops, a vacuum
is created in its absence which refills the nozzle with ink.[5]
The second method is known as a “Piezoelectric” printer.
Piezoelectricity is a material property where if a mechanical stress is
applied, an electric potential is created. The opposite is also true, if a
piezoelectric material is exposed to a change in electric potential energy,
then its volume will change.[6] Piezoelectric printers
utilize this property by having piezoelectric crystals in the print head’s ink reservoir.
When a voltage is applied to these crystals they deform and expel tiny ink
droplets out of the nozzle. [5]
References
[1] “Screen printing,” Wikipedia, the
free encyclopedia. 27-May-2015.
[2] “Rotogravure,” Wikipedia,
the free encyclopedia. 23-May-2015.
[3] “How to Use a
Breadboard - learn.sparkfun.com.” [Online]. Available:
https://learn.sparkfun.com/tutorials/how-to-use-a-breadboard. [Accessed:
28-May-2015].
[4] “How-To: Etch a
single sided PCB,” Hackaday. .
[5] “imaging.org -
Online.” [Online]. Available: http://www.imaging.org/ist/resources/tutorials/inkjet_printer.cfm.
[Accessed: 28-May-2015].
[6] “The Piezoelectric
Effect - Piezoelectric Motors & Motion Systems.” [Online]. Available:
http://www.nanomotion.com/piezo-ceramic-motor-technology/piezoelectric-effect/.
[Accessed: 28-May-2015].
Subscribe to:
Posts (Atom)